
Welcome to WordPress. This is your first post. Edit or delete it, then start writing!
Harvested SSH bots passwords
Introduction
If you have an SSH server running on the public interface, you probably know that there are failed login attempts happening all the time. There are bots scanning whole internet subnets looking for an open TCP port 22 and trying all sorts of popular logins and weak passwords. I wanted to know what passwords and logins are they actually using. There is no problem with logins – audit.log should show them. It’s a different story with passwords. They are not logged even if you configure maxium possible debugging level in OpenSSH server. There is a good reason for doing so – it might violate privacy and pose a security threat.
How did I do that?
The cleanest way to do this is to modify OpenSSH source code. I used OpenSSH 6.4p1 version.
You only need to insert one line using logit function in auth-passwd.c file:
[root@krupa src]# diff -r openssh-6.4p1 openssh-6.4p1_mod
diff -r openssh-6.4p1/auth-passwd.c openssh-6.4p1_mod/auth-passwd.c
82a83
> logit("Password, username is: %s-----%s",authctxt->user,password);
/*
 * Tries to authenticate the user using password. Returns true if
 * authentication succeeds.
 */
int
auth_password(Authctxt *authctxt, const char *password)
{
 logit("Password, username is: %s-----%s",authctxt->user,password);
 struct passwd * pw = authctxt->pw;
 int result, ok = authctxt->valid;
#if defined(USE_SHADOW) && defined(HAS_SHADOW_EXPIRE)
 static int expire_checked = 0;
#endif
#ifndef HAVE_CYGWIN
 if (pw->pw_uid == 0 && options.permit_root_login != PERMIT_YES)
 ok = 0;
#endif
 if (*password == '\0' && options.permit_empty_passwd == 0)
 return 0;
#ifdef KRB5
 if (options.kerberos_authentication == 1) {
 int ret = auth_krb5_password(authctxt, password);
 if (ret == 1 || ret == 0)
 return ret && ok;
 /* Fall back to ordinary passwd authentication. */
 }
#endif
#ifdef HAVE_CYGWIN
 {
 HANDLE hToken = cygwin_logon_user(pw, password);
if (hToken == INVALID_HANDLE_VALUE)
 return 0;
 cygwin_set_impersonation_token(hToken);
 return ok;
 }
#endif
#ifdef USE_PAM
 if (options.use_pam)
 return (sshpam_auth_passwd(authctxt, password) && ok);
#endif
#if defined(USE_SHADOW) && defined(HAS_SHADOW_EXPIRE)
 if (!expire_checked) {
 expire_checked = 1;
 if (auth_shadow_pwexpired(authctxt))
 authctxt->force_pwchange = 1;
 }
#endif
 result = sys_auth_passwd(authctxt, password);
 if (authctxt->force_pwchange)
 disable_forwarding();
 return (result && ok);
}
The results
Over the course of approximately 10 months I was able to gather 1315543 attempts which is about 3 per minute!
There were only 172304 unique combinations.
Top 100 login+password combinations
count login password
 5493 root admin
 2883 root 123456
 2505 root password
 2439 root root
 2423 root root123
 2376 root \001
 2336 root 1234
 2330 root 1qaz2wsx
 2274 root redhat
 2252 root passw0rd
 2217 root 12345678
 2178 root 123123
 2177 root admin123
 2130 root 1q2w3e4r
 2113 root P@ssw0rd
 2097 root qwe123
 2086 root 12345
 1995 root abc123
 1985 root 1234567890
 1958 root 123
 1925 root 1q2w3e
 1877 root 123456789
 1834 root root@123
 1815 root 111111
 1794 root Passw0rd
 1751 root toor
 1748 root 123qwe!@#
 1745 root qweasd
 1743 root 2wsx3edc
 1731 root root1234
 1720 root rootroot
 1711 root master
 1710 root rootme
 1709 root zaq12wsx
 1696 root 123qwe
 1694 root 142536
 1693 root 112233
 1687 root abcd1234
 1660 root 123.com
 1657 root manager
 1656 root 654321
 1641 root data
 1636 root 123abc
 1633 root cisco
 1629 root welcome
 1622 root q1w2e3r4t5
 1612 root 123qweasd
 1601 root qazxsw
 1600 root q1w2e3r4
 1598 root test
 1562 root 1234567
 1560 root 1qaz@WSX
 1557 root qwer1234
 1554 root test123
 1552 root 1q2w3e4r5t
 1539 root oracle
 1539 root 1qazxsw2
 1526 root admin@123
 1505 root qwerty
 1502 root 8812345
 1501 root letmein
 1474 root master123
 1471 root 225588
 1454 root administrator
 1453 root temporal
 1450 root 666666
 1448 root p@ssw0rd
 1447 root 123qwe123
 1441 root 123!@#
 1441 root 11111111
 1426 root 123465
 1424 root changeme
 1422 root 123321
 1418 root r00t
 1411 root 123.321
 1404 root qazwsx
 1404 root monitor
 1392 root default
 1387 root firewall
 1373 root 888888
 1372 root huawei
 1364 root samsung
 1360 root pass123
 1357 root qwe123!@#
 1356 root asdf
 1355 root !QAZ2wsx
 1355 root power
 1355 root 1212
 1354 root pass
 1352 root P@$$w0rd
 1347 root password1
 1345 root Password
 1343 root 65432!
 1341 root P@ssword
 1341 root 88888888
 1340 root Admin@123
 1328 root a123456
 1321 root system
 1313 root Abc123
 1311 root 789789
Top 100 users
count user
1106979 root
 94632 admin
 3140 test
 2917 oracle
 2063 postgres
 2029 nagios
 1793 krupa
 1785 pw
 1685 bin
 1642 user
 1539 guest
 1527 ftpuser
 1296 mysql
 1024 testuser
 950 info
 927 ftp
 820 backup
 815 support
 774 webmaster
 705 git
 605 teamspeak
 560 web
 555 usuario
 548 www
 511 tomcat
 509 postmaster
 502 suporte
 461 teste
 423 deploy
 400 www-data
 380 zabbix
 356 webadmin
 353 ubuntu
 348 test2
 331 svn
 331 alex
 316 apache
 309 test1
 304 ftptest
 291 student
 289 minecraft
 275 ts
 274 jboss
 245 jenkins
 242 master
 228 redmine
 218 test3
 217 ts3
 216 cyrus
 213 jira
 205 testftp
 205 cacti
 203 teamspeak3
 201 nobody
 199 user1
 188 hadoop
 181 webuser
 175 news
 174 adm
 170 a
 168 sales
 162 db2inst1
 159 prueba
 159 john
 157 testing
 156 office
 156 mythtv
 150 temp
 148 demo
 145 weblogic
 141 tom
 141 david
 139 cron
 138 tester
 137 mail
 132 vyatta
 131 postfix
 129 gitosis
 124 service
 121 bash
 118 server
 115 michael
 114 gitolite
 113 linux
 113 daemon
 113 ben
 110 ivan
 109 operator
 108 public
 108 mike
 108 jack
 106 http
 105 upload
 105 rsync
 105 daniel
 105 anna
 104 informix
 104 ghost
 102 pi
 102 deployer
There are quite a lot of attempts using my domain name which means those bots have some adaptation abilities.
Top 100 passwords
count password
 9747 123456
 6759 admin
 5863 password
 4362 1234
 3826 12345
 3530 123
 3490 root
 3475 1qaz2wsx
 3414 test
 3339 123123
 3259 abc123
 3258 root123
 3121 12345678
 3085 qwe123
 3073 admin123
 3069 passw0rd
 3053 P@ssw0rd
 3037 redhat
 3007 1q2w3e4r
 2745 1234567890
 2617 test123
 2610 Passw0rd
 2609 111111
 2604 zaq12wsx
 2587 123qwe
 2580 root@123
 2520 qweasd
 2494 112233
 2484 oracle
 2464 2wsx3edc
 2428 master
 2424 142536
 2422 toor
 2420 123qwe!@#
 2410 rootme
 2376 123456789
 2376 \001
 2366 data
 2338 manager
 2332 qwerty
 2323 root1234
 2316 welcome
 2293 rootroot
 2288 cisco
 2281 qazxsw
 2275 q1w2e3r4t5
 2258 123.com
 2216 1q2w3e
 2216 123abc
 2195 123qweasd
 2163 abcd1234
 2152 1234567
 2133 letmein
 2115 8812345
 2103 1qazxsw2
 2089 123!@#
 2085 225588
 2082 123465
 2078 master123
 2073 q1w2e3r4
 2073 admin@123
 2065 qwer1234
 2053 temporal
 2050 123.321
 2044 123qwe123
 2029 1qaz@WSX
 2025 654321
 2008 changeme
 1988 pass
 1979 monitor
 1966 666666
 1934 1212
 1929 1
 1919 firewall
 1887 qwe123!@#
 1874 r00t
 1871 qazwsx
 1869 1q2w3e4r5t
 1851 65432!
 1840 p@ssw0rd
 1834 administrator
 1831 default
 1827 Admin@123
 1825 pass123
 1810 P@$$w0rd
 1803 789789
 1793 Abc123
 1776 123321
 1772 root123!@#
 1765 aa123456
 1765 147147
 1763 11111111
 1754 password1
 1752 q123456
 1723 tang
 1717 admin123#
 1717 888888
 1715 huawei
 1709 system
 1701 adminadmin
Conlusion
Is it a problem? It should not be unless you use one of those passwords. It only creates unnecessary noise in the log files.
If you are concerned about someone guessing your password you can change the port SSH listens on, but there are good reasons not to. I would recommend reading that article even though the author goes to the extreme saying it is absolutely a bad idea. Moving SSH port to some unpredictable value will not protect you from targeted attack but will allow you to buy more time to patch your system in case there is 0day attack on the OpenSSH server and the bots will rush to compromise as many systems as possible as fast as possible – they will scan port 22 only to speed up the process.
Securing your router with iptables firewall
Introduction
Iptables is a linux firewall built into the linux kernel. It is a proven solution that has been around for quite some time (since kernel 2.4). It is used for filtering, NAT and packet mangling. We will not be going through all of the iptables features here. We will focus on the basic features that will help us secure our home router. The assumption here is that you have a router with two interfaces (or subinterfaces): one connecting it to LAN (eth0.1 in our case) and one connecting it to the internet (eth0.2 in our case). You should be familiar with it if you read my previous tutorial.
Do I need this?
It all depends on what you are trying to protect and how your network environment looks like. If you only want to copy the behaviour of the regular home router then you only need NAT rule. It will protect you against any connections initiated from the internet. There are exceptions to this rule: 1. You explicitly specify that a port is forwarded to the internal host. 2. Router and user applications support UPnP protocol (I believe it was enabled by default on my TP-LINK router). With the help of this protocol application can inform router that it needs to forward specific port to it. It happens automatically and without knowledge of the user (of course you can check the status of open ports manually in the web interface of the router). There is an implementation of upnp on linux but we will not be covering it. I am not using it and haven’t noticed any problems so far.
Tables
There are 4 tables:
- filter – used for packet filtering
- nat – used for address translation
- mangle – used for packet modification
- raw – preprocessing, packets go to this table first
I will only cover filter an nat tables (limited).
Traffic filtering
To disply contents of specific table you can issue command:
iptables -L -t table_name
To see more details (like input and output interface) you can add -v flag. Filter table is the default table. Let’s see the default contents of filter table:
root@raspberrypi:~# iptables -L -v
Chain INPUT (policy ACCEPT 0 packets, 0 bytes)
pkts bytes target prot opt in out source destination

Chain FORWARD (policy ACCEPT 0 packets, 0 bytes)
pkts bytes target prot opt in out source destination

Chain OUTPUT (policy ACCEPT 0 packets, 0 bytes)
pkts bytes target prot opt in out source destination
You can see that there are three so-called “chains”: INPUT, OUTPUT and FORWARD. INPUT chain filters packets that are destined to the machine itself (for example someone is trying to connect to server listening on the linux box or there are returning packets for application that initiated connection on this box). In other words it filters packets destined for local process. OUTPUT chain filters packets that originate from that box. FORWARD chain filters packets that are routed through the box. The linux box is not source nor destination of the packet.
Methods of applying rules
You can add rule immediately using iptables command. Please note that you need root privileges to modify iptables rules.
iptables -A INPUT -i eth0.2 -j DROP
It will cause all packets which are destined for local system and are incoming on the eth0.2 interface to be dropped. It will be applied immediately. However, it won’t persist through the reboot. You need to save them to a file first.
iptables-save > /etc/iptables
If you display contents of the /etc/iptables file you will see the skeleton of a valid configuration file that you can edit manually and apply to the running configuration.
# Generated by iptables-save v1.4.14 on Sun Dec 1 22:59:53 2013
*nat
:PREROUTING ACCEPT [10:674]
:INPUT ACCEPT [9:561]
:OUTPUT ACCEPT [0:0]
:POSTROUTING ACCEPT [0:0]
COMMIT
# Completed on Sun Dec 1 22:59:53 2013
# Generated by iptables-save v1.4.14 on Sun Dec 1 22:59:53 2013
*filter
:INPUT ACCEPT [9:501]
:FORWARD ACCEPT [135:11104]
:OUTPUT ACCEPT [377:48999]
COMMIT
# Completed on Sun Dec 1 22:59:53 2013
# Generated by iptables-save v1.4.14 on Sun Dec 1 22:59:53 2013
*raw
:PREROUTING ACCEPT [640:55452]
:OUTPUT ACCEPT [377:48999]
COMMIT
# Completed on Sun Dec 1 22:59:53 2013
# Generated by iptables-save v1.4.14 on Sun Dec 1 22:59:53 2013
*mangle
:PREROUTING ACCEPT [640:55452]
:INPUT ACCEPT [503:43636]
:FORWARD ACCEPT [135:11104]
:OUTPUT ACCEPT [377:48999]
:POSTROUTING ACCEPT [512:60103]
COMMIT
# Completed on Sun Dec 1 22:59:53 2013

I will come back and explain the file syntax later.

To restore the rules from the file (apply them to the running configuration) use:
iptables-restore < /etc/iptables
How do rules in a chain work
Chain in a table is a list of rules. When a packet arrives the rules are examined from top to bottom. If the criteria match, the action is taken. The packet is processed until it is dropped, rejected or accepted. If it is accepted then it moves to another table. For example, when packet is routed through my home router with NAT enabled, the packet goes through filter table, nat table, raw table and mangle table. In this case raw and mangle table will not do anything to the packet (they have default policy ACCEPT on all their chains). If you want to learn more here is a good tutorial on iptables.
Actions
ACCEPT – Packet is accepted
DROP – Packet is silently dropped
REJECT – Packet is dropped but the sender is notified by packet with RST flag sent (if it was TCP packet) or ICMP port unreachable (udp).
So should we use drop or reject?
I prefer to use REJECT in a trusted environment. It makes troubleshooting network problems easier.
In the untrusted networks I prefer to drop packets. If you reject them actively then someone can flood your host with packets destined for closed port and saturate not only your downstream bandwidth but also upstream bandwidth by forcing you to reply to those packets (or even use you in the DDoS attack).
Default policy
The default policy is the action that is taken when no rules in a chain match the packet or if the rules that match don’t apply DROP, REJECT or ACCEPT policy. You can configure it using -P flag:
iptables -t table_name -P chain_name action
for example (filter is the default table)
iptable -P OUTPUT ACCEPT
Text file syntax
In the abovementioned text file the tables are marked with asterisk. After semicolon there is chain name along with the default policy. In the brackets there are number of packets and bytes that matched the policy (they are there so that you don’t lose your counters state after the reboot or configuration changes). Below them you can enter the rules you want applied to the chain. You enter them in the same way as you do in command line but without ‘iptables’ at the front. At the end of table configuration there is COMMIT keyword. See the examples below.
Clearing rules
In order to clear all rules in a table use
iptables -t table_name -F
Please note it does not reset default policy of the chains to ACCEPT!
NAT
This is bare minimum (remember to enable ip forwarding!) I already discussed in the previous post .
iptables -t nat -A POSTROUTING -o eth0.2 -j MASQUERADE
Where eth0.2 is the interface facing the internet. If you want to write it directly to the configuration file you can do this in this manner:
...
*nat
:PREROUTING ACCEPT [10:674]
:INPUT ACCEPT [9:561]
:OUTPUT ACCEPT [0:0]
:POSTROUTING ACCEPT [0:0]
-A POSTROUTING -o eth0.2 -j MASQUERADE
COMMIT
...
Remember you can always generate the config file using iptables-save command.
If you want to forward specifc port on your local machine use (in this case there is a web server on the 192.168.33.10 internal address that I want accessible from the internet):
iptables -t nat -A PREROUTING -i eth0.2 -p tcp --dport 80 -j DNAT --to-destination 192.168.33.10:80
or in the config file:
-A PREROUTING -i eth0.2 -p tcp --dport 80 -j DNAT --to-destination 192.168.33.10:80
Filtering traffic
Instead of specifying ACCEPT, DROP or REJECT actions you can redirect the packet to be processed by your custom chain. If your custom chain doesn’t perform any of these actions on the packet, then the packet returns to the chain it was before in.
Create custom chain by:
iptables -t table -N my_custom_chain
Stateful firewall
Iptables supports stateful firewall. What it means is that it remembers that a connection has been made and allows returning traffic. By using this you can allow connections to be initiated from one zone of your firewall to the other, but not the other way around. It is similar to the NAT: clients from LAN can easily initiate connections to the outside world, but hosts in the internet can not initiate connections to the clients in LAN unless you forward a port. There are 5 connection states in iptables:
- NEW – the packet initiates new connection
- ESTABLISHED – packet is a part of already established connection
- RELATED – some protocols, like FTP open secondary connections using data exchanged in the original connection. Iptables can detect it (for chosen protocols, like FTP) and allow such traffic
- INVALID – packet can’t be identified or doesn’t have state
- UNTRACKED – you can mark the connection as untracked in the raw table
Let’s see the example:
*filter
#default policies
:INPUT DROP [9:501]
:FORWARD DROP [135:11104]
:OUTPUT ACCEPT [377:48999]

#custom chains created
:lan_bad_conn - [0:0]
:wan_incoming - [0:0]

#allow loopback traffic so that local applications can communicate by TCP/IP protocol
-A INPUT -i lo -j ACCEPT
#allow ssh and icmp to our router
-A INPUT -i eth0.1 -p tcp -s 192.168.33.0/24 --dport 22 -m state --state NEW,RELATED,ESTABLISHED -j ACCEPT
-A INPUT -i eth0.1 -p icmp -j ACCEPT
#For DHCP info check the end of the post!

#let's filter and log bad traffic incoming from WAN
-A INPUT -i eth0.2 -j wan_incoming

#and from LAN
-A INPUT -i eth0.1 -j lan_bad_conn

#don't forget to allow traffic to your internal server that you forwarded ports to
#-A FORWARD -i eth0.2 -p tcp --dport 80 -j ACCEPT

#allow initiating connections from LAN to the internet. Don't forward packets with source ip addresses that shouldn't be there. These forward rules are actually obsolete when you're behind NAT.
-A FORWARD -i eth0.1 -s 192.168.33.0/24 -m state --state NEW,RELATED,ESTABLISHED -j ACCEPT
#allow returning traffic
-A FORWARD -i eth0.2 -m state --state RELATED,ESTABLISHED -j ACCEPT
#filter and log bad traffic
-A FORWARD -j lan_bad_conn

# filter and log packets with source address that is not expected on our LAN. Limit filtering to 1 message per minute with 5 messages burst. Add prefix "lan_bad_conn: " to logged messages. Messages will be logged to /var/log/messages by default but that depends on the configuration of your syslog daemon. '!' means negation.
-A lan_bad_conn ! -s 192.168.33.0/24 -m limit --limit 1/min --limit-burst 5 -j LOG --log-prefix "lan_bad_conn: "
# filter and log bad traffic
-A lan_bad_conn -m state --state INVALID,UNTRACKED -m limit --limit 1/min --limit-burst 5 -j LOG --log-prefix "lan_bad_conn: "
# drop those packets
-A lan_bad_conn -j DROP

#Allow only returning traffic from connections established by the router itself. Log and drop the rest
-A wan_incoming -m state --state RELATED,ESTABLISHED -j ACCEPT
-A wan_incoming -m state --state INVALID,NEW,UNTRACKED -m limit --limit 1/min --limit-burst 5 -j LOG --log-prefix "wan_bad_incoming: "
-A wan_incoming -m state --state INVALID,NEW,UNTRACKED -j DROP

#commit
COMMIT
Viewing connections
You can view the current connections tracked by iptables by viewing file /proc/net/ip_conntrack
Do iptables always work?
No. Try to block DHCP requests using iptables. It won’t work. That’s why I didn’t include the rule allowing my clients to obtain ip address from DHCP server. Iptables only work with standard TCP/IP stack. However application can open raw socket which allows it bypass TCP/IP stack and create custom packets, including custom protocols. The DHCP discover packets will eventually be blocked by iptables, but they will be seen by the application first. Is it a security threat? Not so much, because you need root privileges to open raw socket. If malicious application has root privileges then your server is already fully compromised because the application will have access to everything (for example it could modify iptables rules).There is an interesting discussion on this mailing list: https://www.mail-archive.com/netfilter@lists.samba.org/msg03905.html .
Conclusion
These are the basics of iptables that come to my mind. I plan to explain some additional, more advanced features of iptables in the future.
Raspberry pi as a home router part 2: Basic routing
Introduction
In the previous article we turned TP-LINK router into VLAN-enhanced switch to support our “router on a stick” configuration. In this article we will configure basic routing and services needed to get working internet connection for your LAN devices. In this tutorial we will be using Raspberry PI version B (the one with fast ethernet port) and Raspbian linux – one of the most popular RPI linux distributions based on Debian.
Configuring VLAN interfaces
First we need to install proper kernel modules that add VLAN functionality. We will be issuing all commands as root.
apt-get install vlan
We need to make sure that the modules are loaded on system startup.
echo 8021q >> /etc/modules
Reboot your raspberry pi. If you don’t want to reboot it you can load it manually by typing:
modprobe 8021q
Next, it’s time to create VLAN subinterfaces. We could accomplish that by using vconfig utility but we want our configuration to persist through reboot so we will be editing proper configuration files. Interface eth0 will capture and transmit untagged frames. On the other hand interfaces eth0.N will work with tagged frames belonging to VLAN number N. Since we have chosen to tag both VLAN 1 and VLAN 2 on the trunk link in the previous part of the tutorial , we will create proper configuration for this scenario. I’ll just paste my configuration file. The file responsible for basic network configuration in Debian-like systems is /etc/network/interfaces:
auto lo eth0.1 eth0.2
allow-hotplug eth0
iface lo inet loopback

iface eth0.1 inet static
 address 192.168.33.1
 netmask 255.255.255.0
iface eth0.2 inet dhcp
The first line is very important. According to the debian documentation auto keyword means that the interface will start with the system. In my understanding if you skipped this you would have to start the interface manually each time using ifconfig eth0.1 up command. This is not the case. If you don’t include this line the interface will not even be created at startup so it is mandatory. allow-hotplug should bring the interface up when cable is plugged in if I understand it correctly but it’s still not working for me. This is minor flaw and I will think about fixing it later. You can reboot and check if the settings are applied.
WAN side
You should get your ip address from ISP automatically with the above settings. You can also configure it statically if your ISP gave you static IP address.
DNS servers addresses will be save automatically to the /etc/resolv.conf file.
LAN side – DHCP server
Devices in your LAN will be getting addresses from the DHCP server on your router. This is not mandatory – you can configure all of them statically, however I recommend setting up DHCP server because it is very easy. First install it:
apt-get install isc-dhcp-server
I also recommend installing a tool that will help you to easily manage which daemons will be started automatically at boot time:
apt-get install chkconfig
DHCP server configuration file is in /etc/dhcp/dhcpd.conf. You just have to add additional section at the bottom specifying the settings for your LAN subnet:
subnet 192.168.33.0 netmask 255.255.255.0 {
range 192.168.33.100 192.168.33.200;
option routers 192.168.33.1;
default-lease-time 86400;
max-lease-time 604800;
option domain-name-servers 8.8.8.8, 8.8.4.4;
}
range value defines addresses range that can be assigned dynamically
routers value is the default gateway
default-lease-time and max-lease-time – when a client requests the ip address, it is given to it only for a limited amount of time called the lease time. Default-lease-time is given when the client doesn’t ask for specific lease time. Max-lease-time is a maximum client can get.
domain-name-servers are addresses of DNS servers
You can add reservation for a client. This way that client will always get the same IP address from DHCP. The clients are recognized based on MAC address. Example:
host my_pc { hardware ethernet 01:23:45:67:89:ab ; fixed-address 192.168.33.20;}
Host name (my_pc in this case) is arbitrary and doesn’t have to correspond to any real value. Reservations should be configured outside of range of dynamically assigned addresses. If for some reason you need it to be in the middle of dynamic range you can split the range. For example, if you wanted to assign reservation for address 192.168.33.150 inside range 192.168.33.100-200, you can split the range in two:
range 192.168.33.100 192.168.33.149;
range 192.168.33.151 192.168.33.200;
In order to apply configuration changes you need to restart the DHCP server:
service isc-dhcp-server restart
To make sure that it is always started after reboot enter:
chkconfig isc-dhcp-server on
Routing
You don’t need to worry about basic routing. Routes for directly connected networks are automatically added to the routing table. Default gateway is automatically added to routing table by DHCP client based on the information from your ISP. You can display your routing table by issuing command:
route
You only need to enable routing because by default it is disabled. To enable it immediately (it will not persist after reboot):
echo 1 > /proc/sys/net/ipv4/ip_forwardTo enable it permanently (reboot required) add or change or uncomment the following line in /etc/sysctl.conf:
net.ipv4.ip_forward=1
Network Address Translation
You need NAT so that multiple machines behind your router can use a single global IP address that ISP gives you. To enable NAT enter:
iptables -t nat -A POSTROUTING -o eth0.2 -j MASQUERADEIf you want to forward a port (for example port 80 on 192.168.33.138 internal address) to the server inside your LAN enter:
iptables -t nat -A PREROUTING -i eth0.2 -p tcp --dport 80 -j DNAT --to-destination 192.168.33.138:80
The changes will not persist through reboot. First, save the rules to the file:
iptables-save > /etc/iptables
Then you need to make sure those rules are applied when the system starts. A good place for that is to create a script inside /etc/network/if-pre-up.d directory. All scripts inside that directory are executed when the interface is brought up.
vi /etc/network/if-pre-up.d/iptables
Paste the following content:
#!/bin/bash

iptables-restore < /etc/iptables

exit 0
Then make sure it is executable:
chmod +x /etc/network/if-pre-up.d/iptables
You can display the contents of your iptables NAT table by typing:
iptables -L -t nat
Iptables is quite powerful linux firewall and it has much more features. I will make an article about them sometime later.
Summary
This should get your Raspberry Pi router up and running really fast but with basic functionalities (similar to the features of cheap 20$ routers). I will be covering more advanced topis later. It is very possible that I forgot something or I made a mistake. If so, please let me know down below in comments section.
Raspberry pi as a home router part 1: VLANs on TP-LINK TL-WR740N
Introduction
I was previously using TP-LINK TL-WR740N v4 as my home router/switch/AP. It is cheap (about 25$) and does not provide too much features but it certainly works well and is enough for an average home user. I needed something that I could play with a lot more, something that could give me more control over my internet connection, provide logging capabilites, advanced routing, firewall, qos and security enhancements. All I really needed for this is just a linux box. There are readily available open source applications that could provide me with all these features. Of course it’s not plug-and-play solution and it needs a lot of insight and tinkering but that’s just the fun part for me.
Hardware
What I needed was a small, not-power-hungry, quiet and cheap linux server. It should preferably have 2 ethernet ports and built-in wifi (or at least pci or usb ports so I could plug additional interface cards). I considered mini-ITX mainboard based server as it would give me most flexibility and even possibility to run virtualization on x86 CPU with support for hardware virtualization and 2 HDDs for RAID 1. I didn’t go for it because I didn’t want to spend so much money plus it would most likely be actively cooled which would generate noise. Then my eyes turned to Raspberry Pi, which is a very cheap and small ARM-based computer. The main caveat of it is that it only has one FastEthernet port which makes it not very suitable for a router. You can add additional ethernet port as an USB adapter (or wifi adapter). However, I didn’t like the idea to add two USB adapters to have a complete router with AP. I also found more expensive alternative of Raspberry Pi called Utilite which would be just perfect as it has 2 x GbE ports plus Wifi built-in, but again the cost was much higher (plus shipping costs from Israel). That’s why I decided to work with what I have creating low-cost solution.
Architecture
The idea is to use TP-Link TL-WR740N as a switch and access point and Raspberry Pi as router. To accomplish that with only one FastEthernet port I would need VLAN support on the switch to deploy something called “router on a stick”.
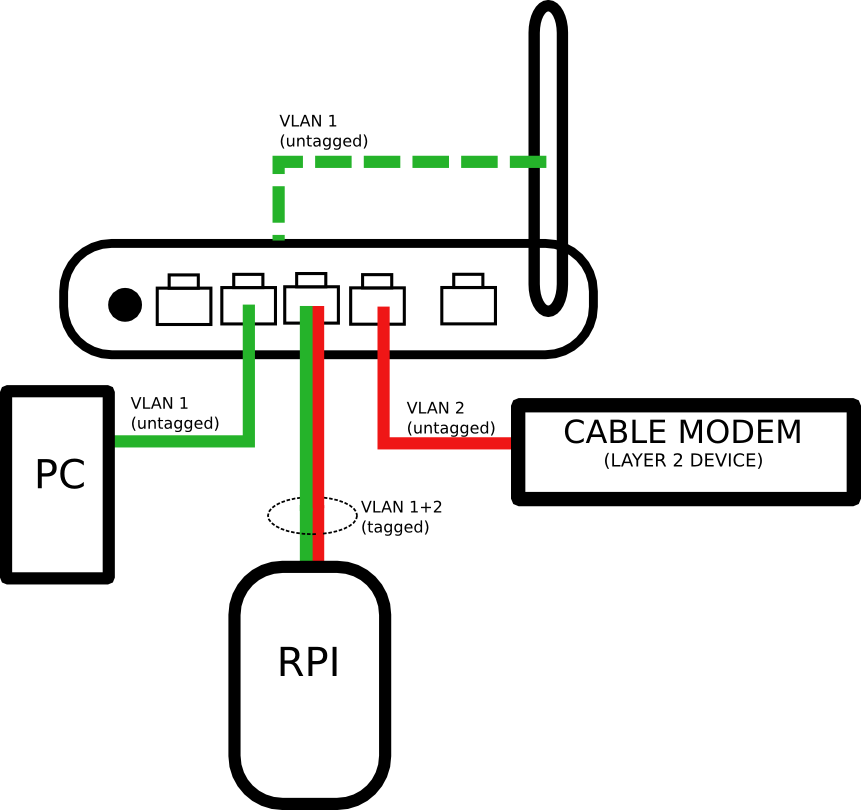
VLANs allow you to create logically separated layer 2 networks. Without VLANs all ports on the switch belong to one logical network and frames sent from one port can freely travel to any other port. However if you put ports in separate VLANs then traffic from one VLAN can’t go to another VLAN without a router.
Cable modem connects you to the provider (it could as well be ADSL modem or radio antenna) and forwards L2 frames to the VLAN 2 (the numbers are arbitrary). If your modem already has a router built in then you can still use this topology but you will most likely have to double NAT. Frames which are untagged simply do not carry VLAN information within them. The switch recognizes which VLAN they belong to because the port is statically configured to be a member of specific VLAN. Switch port that has raspberry PI connected is a member of two VLANs (it is also called trunk port). Frames transmitted across this interface are tagged which means they contain VLAN infromation. That way router and the switch are able to tell which VLAN the frame belongs to.
When you receive a packet from the internet it travels through the modem, VLAN2 port, comes into raspberry PI via trunk port, RPI deals with routing, NAT and other functions that you implement, comes out of the same port (but this time via VLAN 1) and is forwarded to the PC or WiFi client which also belong to the VLAN1. Please note that the traffic needs to pass the trunk interface twice (once in inbound direction and once in outbound direction). This has performance implications. You can think of it as the half-duplex port even though it’s full-duplex port physically. When you download something from the internet with 100Mbps speed (the speed of RPI and TP-LINK WR740N ports) you can do this but it will also take up “upload” of the port. In other words your upload+download speed is capped at 100Mbps but I don’t think it’s the problem for most home users.
Switch configuration
Installation
Note that there is no Web interface by default for TP-LINK WR740N openwrt images.
http://wiki.openwrt.org/doc/howto/generic.flashing gives you a generic explanation of the installation process. You will not need most of the information given there. Let me walk you through the installation:
1. Identify your exact model (there are versions 1,2,3 and 4). http://wiki.openwrt.org/toh/tp-link/tl-wr740n can give you some useful information. Please note that there is “debricking” section in case something goes wrong. I did not need to do this but if you lose connectivity to your router you can find out how to get it back online in this section.
2. Download firmware from http://downloads.openwrt.org/attitude_adjustment/12.09/ar71xx/generic/
I used http://downloads.openwrt.org/attitude_adjustment/12.09/ar71xx/generic/openwrt-ar71xx-generic-tl-wr740n-v4-squashfs-factory.bin
There are “JFFS2” and “squasfs” versions. I am not sure what is the difference. Squashfs is recommended. “Factory” is for installing openwrt on router with factory image and “sysupgrade” is for upgrading.
3. Reset TP-LINK to factory defaults.
4. Use Firmware Upgrade function and select image of OpenWrt.
5. After the router reboots telnet to the address 192.168.1.1. There is no password.
6. Use command “passwd”. It will prompt you to choose your root password. After you choose it telnet will be disabled and SSH will be enabled. Type “exit”.
7. Log in with your chosen password on “root” account using SSH. You can now configure your OpenWrt device.
Network configuration
All the interesting configuration is in the directory /etc/config.
Network configuration is stored in /etc/config/network. Let’s view the defaults.
config interface 'loopback'
 option ifname 'lo'
 option proto 'static'
 option ipaddr '127.0.0.1'
 option netmask '255.0.0.0'

config globals 'globals'
 option ula_prefix 'fd9c:6323:7240::/48'

config interface 'lan'
 option ifname 'eth0'
 option type 'bridge'
 option proto 'static'
 option ipaddr '192.168.1.1'
 option netmask '255.255.255.0'
 option ip6assign '60'

config interface 'wan'
 option ifname 'eth1'
 option proto 'dhcp'

config interface 'wan6'
 option ifname '@wan'
 option proto 'dhcpv6'

config switch
 option name 'switch0'
 option reset '1'
 option enable_vlan '1'

config switch_vlan
 option device 'switch0'
 option vlan '1'
 option ports '0 1 2 3 4'
- config interface ‘lan’ s section is pretty straifghtforward. You can set ip address and netmask of lan interface of your TP-LINK router.
- config switch section is misleading. I would expect that you need to enable additional VLANs here but this is not the case. You don’t need to do anything here. I don’t know what it’s for.
- config switch_vlan
This is where you’ll be configuring VLAN settings. If you need to add additional VLAN just add another config switch_vlan section (identical section name). Leave the option device ‘switch0’ as is. Specify which VLAN you want to configure in option vlan.
Option ports is a list of physical and logical ports that are members of the VLAN. If you use number alone like 1,2,3 and so on it means that the VLAN will be untagged on that port (of course you can have only one untagged VLAN on port). If you append letter “t” to the number it will tag the frames of that VLAN on that port.
Port numbering
0 – logical port that connects the switch to the CPU of the device. You will only need to add VLAN to this interface when you need to manage the device using IP from that VLAN or if you want it to provide services like DHCP or DNS on that VLAN. We will add VLAN 1 (which coressponds to LAN) to the port 0 untagged.
1,2,3,4 – physical ports
Please note the numbering is not in order!

If you are unsure which ports are you configuring or you find this information incorrect you can display which ports are currently up/down by issuing command:
swconfig dev switch0 show
This is the configuration that I use:
config interface 'loopback'
option ifname 'lo'
option proto 'static'
option ipaddr '127.0.0.1'
option netmask '255.0.0.0'

config globals 'globals'
option ula_prefix 'fd9c:6323:7240::/48'

config interface 'lan'
option ifname 'eth0'
option type 'bridge'
option proto 'static'
option ipaddr '192.168.33.254'
option netmask '255.255.255.0'
option ip6assign '60'

config interface 'wan'
option ifname 'eth1'
option proto 'dhcp'

config interface 'wan6'
option ifname '@wan'
option proto 'dhcpv6'

config switch
option name 'switch0'
option reset '1'
option enable_vlan '1'

config switch_vlan
option device 'switch0'
option vlan '1'
option ports '0 1 3t 4'

config switch_vlan
option device 'switch0'
option vlan '2'
option ports '2 3t'
As you can see port 3 is being being used as trunk and will be connected to RPI. Port 2 will be connected to WAN and port 1 and 4 will be LAN ports. I will not be using eth1 which is normally WAN port when using stock firmware.
Optional
If you want to create multiple IP interfaces (one for each VLAN) you can just add another config interface section and specify ifname as eth0.N where N is VLAN number. Example:
config interface 'lan2'
option ifname 'eth0.2'
option type 'bridge'
option proto 'static'
option ipaddr '192.168.2.1'
option netmask '255.255.255.0'
Don’t forget to add tagged VLAN to the port 0!
Wireless
Wifi is disabled by default on openwrt. The relevant configuration file is /etc/config/wireless. In order to enable the wireless you need to set option disabled to 0 (or remove the line).
The most popular,secure and completely sufficient configuration for home users is just WPA2-encrypted connection using pre-shared key.
Sample configuration is here:
config wifi-device radio0
 option type mac80211
 option channel 1
 option hwmode 11ng
 option path 'platform/ar933x_wmac'
 option htmode HT20
 list ht_capab SHORT-GI-20
 list ht_capab SHORT-GI-40
 list ht_capab RX-STBC1
 list ht_capab DSSS_CCK-40
 # REMOVE THIS LINE TO ENABLE WIFI:
 option disabled 0

config wifi-iface
 option device radio0
 option network lan
 option mode ap
 option ssid your_ssid_here
 option encryption psk2
 option key your_password_here
Disable unnecessary services
RPI will provide DHCP and DNS services for our network. You certainly do not want two DHCP servers running concurrently in your LAN. Daemon which is responsible for both of these functions is called dnsmasq. To prevent it from starting automatically after reboot type:
/etc/init.d/dnsmasq disable
Apply settings
After all configuration changes you can just reboot your router and hope you do not cut yourself out of management:
reboot
Final words
This was first part of the tutorial. I will add routing part which is more interesting soon!